手机的云备份较小,而且数据存储在别人服务器上也没有那么安心。
而私有云相册则成为了一个理想的解决方案,其中开源的Immich更是以其强大的功能和易用性脱颖而出 在githab上高达69.6k的star数量,足以说明它的优秀
正确的使用方法:
亲,不要生气,俺专门给你做一个云相册,用来给你存图片(三天内或更长,地位增长70%)
亲,我想给你做一个专门的云相册,可以自动分析图片归类,但是需要一点点硬件支持,可以给升级下5090ti 再加几条1Tb固态和32G内存条
相比其他优势:
颜值即正义(女朋友看了心花怒放):Material Design设计风格,操作流畅度吊打群晖相册
零学习成本:手机端自动备份+智能分类,老人小孩都能用
硬件不挑食:树莓派也能跑,还支持GPU加速AI识别
教程提供方案:
有低性能公网IP VPS服务器域名发布方案。
没有公网ip 发布方案。
Immich 私有云相册的一些特性
多平台支持:提供了移动端和 Web 网页端版本,可以在任何设备上随时访问相册。
自动备份: 和 iCloud、谷歌相册 一样,Immich 支持后台自动备份照片和视频。
选择性备份:支持备份指定的相册,而不必备份所有的照片和视频。
高级搜索功能:用户可以根据元数据、对象、人脸等条件进行搜索,轻松找到照片。
安全性: Immich 完全开源,且数据存储在你自己的服务器上。数据安全可控,同时还支持 OAuth 进行身份验证。
多用户支持和分享: Immich 支持多用户,并允许用户创建共享相册,与朋友、家人或合作伙伴分享照片和视频。
地理位置信息: 应用程序提供了地图视图,允许用户查看和浏览地理位置信息,以及在地图上查看媒体内容。
人脸识别和聚合: Immich 可识别人脸并进行聚合,使用户能够更轻松地组织和查找他们的照片。
离线支持: 移动端应用程序提供离线支持,允许在没有网络的情况下查看照片和视频。
功能特性
拥有自己的 iPhone、Android 应用,只需要在移动应用中填入服务器段的 API 地址,即可使用,两者功能有少许不同:
备份功能
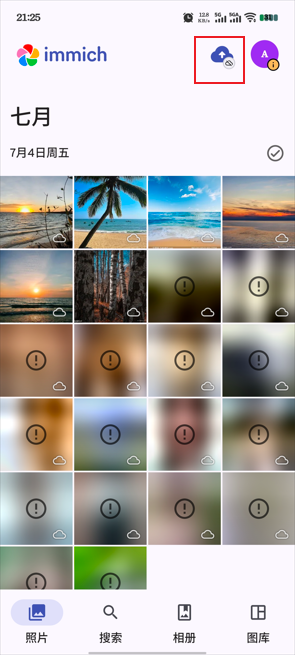
配置好服务器端,登录移动应用之后,给于相册权限,就可以备份了,支持前台备份与后台备份,使用起来非常简单,有中文界面
安装教程
服务器准备
服务器配置说明:
官方地址
官网安装地址:https://immich.app/docs/install
埋坑指南:
建议全程使用科学方式
注意修改默认.env和docker配置文件
模型下载失败需要科学方式且yml配置代理
若无科学方式,可以用我提供的模型文件下载
模型路径注意不要错了,可以使用docker logs -f docker_id 查看日
安装docker:
打开本站docker安装指南:https://halo.blog360.sbs/archives/dockeran-zhuang-jiao-cheng
1.创建项目目录
bash
mkdir -p /opt/immich/{library,postgres} && cd /opt/immich2. 配置 Immich
2.1 下载官方配置文件
bash
# 下载 docker-compose.yml 和 .env 模板
wget -O docker-compose.yml https://github.com/immich-app/immich/releases/latest/download/docker-compose.yml
wget -O .env https://github.com/immich-app/immich/releases/latest/download/example.env
2.2 修改环境文件
编辑 .env 文件:
bash
nano .env关键配置修改:
env
# You can find documentation for all the supported env variables at https://immich.app/docs/install/environment-variables
# The location where your uploaded files are stored
UPLOAD_LOCATION=./library
# The location where your database files are stored. Network shares are not supported for the database
DB_DATA_LOCATION=./postgres
# To set a timezone, uncomment the next line and change Etc/UTC to a TZ identifier from this list: https://en.wikipedia.org/wiki/List_of_tz_database_time_zones#List
# TZ=Etc/UTC
TZ=Asia/Shanghai
# The Immich version to use. You can pin this to a specific version like "v1.71.0"
IMMICH_VERSION=release
# Connection secret for postgres. You should change it to a random password
# Please use only the characters `A-Za-z0-9`, without special characters or spaces
DB_PASSWORD=postgres
# The values below this line do not need to be changed
###################################################################################
DB_USERNAME=postgres
DB_DATABASE_NAME=immich
修改docker-compose.yml 文件
#
# WARNING: To install Immich, follow our guide: https://immich.app/docs/install/docker-compose
#
# Make sure to use the docker-compose.yml of the current release:
#
# https://github.com/immich-app/immich/releases/latest/download/docker-compose.yml
#
# The compose file on main may not be compatible with the latest release.

name: immich

services:
  immich-server:
    container_name: immich_server
    image: ghcr.io/immich-app/immich-server:${IMMICH_VERSION:-release}
    # extends:
    #   file: hwaccel.transcoding.yml
    #   service: cpu # set to one of [nvenc, quicksync, rkmpp, vaapi, vaapi-wsl] for accelerated transcoding
    volumes:
      # Do not edit the next line. If you want to change the media storage location on your system, edit the value of UPLOAD_LOCATION in the .env file
      - ${UPLOAD_LOCATION}:/usr/src/app/upload
      - /etc/localtime:/etc/localtime:ro
    env_file:
      - .env
    ports:
      - '2283:2283'
    depends_on:
      - redis
      - database
    restart: always
    healthcheck:
      disable: false

  immich-machine-learning:
    container_name: immich_machine_learning
    # For hardware acceleration, add one of -[armnn, cuda, rocm, openvino, rknn] to the image tag.
    # Example tag: ${IMMICH_VERSION:-release}-cuda
    image: ghcr.io/immich-app/immich-machine-learning:${IMMICH_VERSION:-release}
    # extends: # uncomment this section for hardware acceleration - see https://immich.app/docs/features/ml-hardware-acceleration
    #   file: hwaccel.ml.yml
    #   service: cpu # set to one of [armnn, cuda, rocm, openvino, openvino-wsl, rknn] for accelerated inference - use the `-wsl` version for WSL2 where applicable
    environment:
      http_proxy: http://192.168.242.1:3067
      https_proxy: http://192.168.242.1:3067
    volumes:
      - ./model-cache:/cache
    env_file:
      - .env
    restart: always
    healthcheck:
      disable: false

  redis:
    container_name: immich_redis
    image: docker.io/valkey/valkey:8-bookworm@sha256:fec42f399876eb6faf9e008570597741c87ff7662a54185593e74b09ce83d177
    healthcheck:
      test: redis-cli ping || exit 1
    restart: always

  database:
    container_name: immich_postgres
    image: ghcr.io/immich-app/postgres:14-vectorchord0.4.3-pgvectors0.2.0
    environment:
      POSTGRES_PASSWORD: ${DB_PASSWORD}
      POSTGRES_USER: ${DB_USERNAME}
      POSTGRES_DB: ${DB_DATABASE_NAME}
      POSTGRES_INITDB_ARGS: '--data-checksums'
      # Uncomment the DB_STORAGE_TYPE: 'HDD' var if your database isn't stored on SSDs
      # DB_STORAGE_TYPE: 'HDD'
    volumes:
      # Do not edit the next line. If you want to change the database storage location on your system, edit the value of DB_DATA_LOCATION in the .env file
      - ${DB_DATA_LOCATION}:/var/lib/postgresql/data
    restart: always

volumes:
  model-cache:
3. 启动 Immich 容器
bash
docker-compose up -d验证服务运行:
bash
docker-compose ps应看到 immich-server、immich-microservices 等容器状态为 Up。
4. AI配置(网盘所有模型路径https://pan.quark.cn/s/8ae01a52687b)
部署完成后ai功能正常下载,需要手动下载镜像映射,如不需使用,再页面关闭
// 若不需要模型可以直接删除
ghcr.io/immich-app/immich-machine-learning
sudo apt-get install git-lfs
git clone https://huggingface.co/immich-app/buffalo_l
git clone https://huggingface.co/immich-app/ViT-B-32__openai
cd buffalo_l (一会再ViT-B-32__openai)
git lfs install
git lfs pull复制目录到 /opt/immich/中
cp ViT-B-32__openai /opt/immich/clip
cp buffalo_l /opt/immich/facial-recognition
//最后
root@test:/opt/immich/model-cache# tree -L 3 /opt/immich/
/opt/immich/
├── docker-compose.yml
├── library
├── model-cache
│ ├── clip
│ │ └── ViT-B-32__openai
│ └── facial-recognition
│ └── buffalo_l
└── postgres默认模型无法中文搜索,我们可以自定义XLM-Roberta-Large-Vit-B-16Plus模型 (此模型会占用大量硬盘和内存)
git clone https://huggingface.co/immich-app/XLM-Roberta-Large-Vit-B-16Plus
cd XLM-Roberta-Large-Vit-B-16Plus
git lfs install
git lfs pull
参数配置:
构建虚拟局域网
参照以下站内教程:https://halo.blog360.sbs/archives/zerotierzui-qiang-nei
发布教程
1. 配置 Nginx 反向代理
1.1 安装 Nginx
bash
sudo apt install -y nginx1.2 创建 Nginx 站点配置
创建配置文件:
bash
sudo nano /etc/nginx/sites-available/your-domain.com内容如下(替换 your-domain.com):
nginx
server {
listen 80;
server_name test.blog360.sbs;
# return 404; # managed by Certbot
location / {
client_max_body_size 50m;
proxy_set_header Host $host;
proxy_set_header X-Real-IP $remote_addr;
proxy_set_header X-Forwarded-For $proxy_add_x_forwarded_for;
proxy_pass http://172.28.2.4/; #后端 真实服务器
#proxy_pass http://git;
index index.html index.htm A1-index.html;
}
}1.3 启用站点配置
bash
sudo ln -s /etc/nginx/sites-available/immich.conf /etc/nginx/sites-enabled/
sudo nginx -t  # 测试配置
sudo systemctl reload nginx
2. 配置 SSL 证书(使用 Certbot)
bash
# 安装 Certbot
sudo apt install -y certbot python3-certbot-nginx
# 获取证书(自动修改 Nginx 配置)
sudo certbot --nginx -d your-domain.com
# 设置自动续期
sudo certbot --nginx -d your-domain.com3 nginx重要配置
location / {
proxy_pass http://100.79.201.51:2283/;
proxy_set_header Host $http_host;
proxy_set_header X-Real-IP $remote_addr;
proxy_set_header X-Forwarded-For $proxy_add_x_forwarded_for;
proxy_set_header X-Forwarded-Proto $scheme;
# WebSocket 支持
proxy_http_version 1.1;
proxy_set_header Upgrade $http_upgrade;
proxy_set_header Connection "upgrade";
# 超时设置
proxy_connect_timeout 300s;
proxy_send_timeout 300s;
proxy_read_timeout 300s;
}
4. 验证访问
浏览器访问
https://your-domain.com首次访问需注册管理员账号
登录后即可使用 Immich
移动端使用教程(安卓)
下载app
前往Immich官网,https://github.com/immich-app/immich/releases 找到对应版本下载
前往谷歌商店直接搜索下载
安装登录app
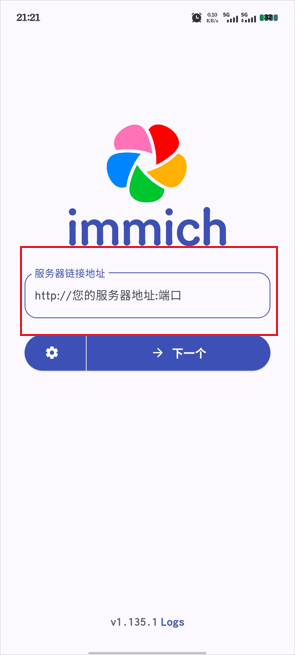
1. 输入服务器地址
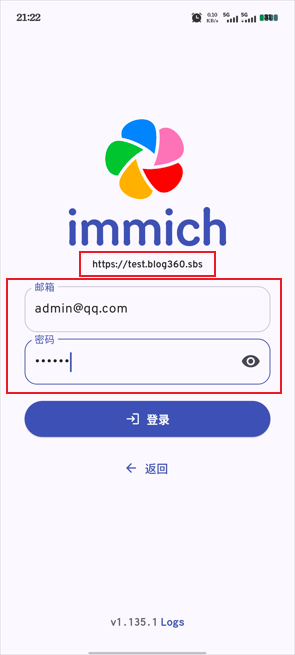
2 输入账号密码登录
同步配置
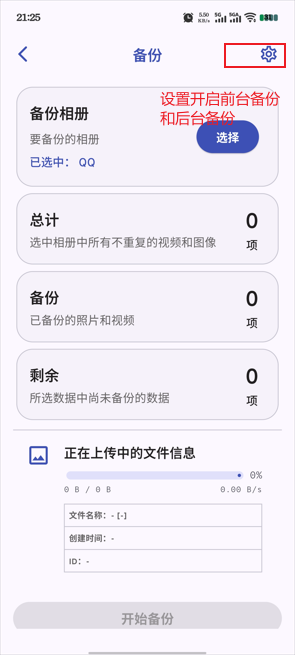
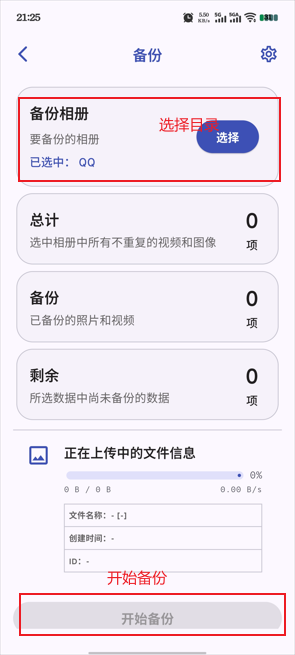
进入同步配置
选择目录,开始备份
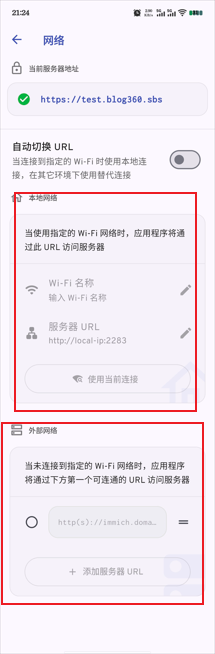
性能优化
局域网与公网自动切换连接
开启前台备份和后台备份