
前言
seafile官方描述是:Seafile 不仅提供了传统网盘的文件同步和共享功能,还提供了可扩展的文件属性和新颖的多维视图功能。 通过结合AI对文件属性的自动生成和管理,Seafile 提供了一个全新的自动化的文件管理体验。
seafile官网地址:Seafile - 开源的企业私有网盘 私有云存储软件 企业维基 知识管理
低成本线上发布:
1. 有公网IP VPS,但是性能资源及其拉跨。
2. 只能上网,没有公网IP。
Linux 原生安装seafile
服务器配置说明:
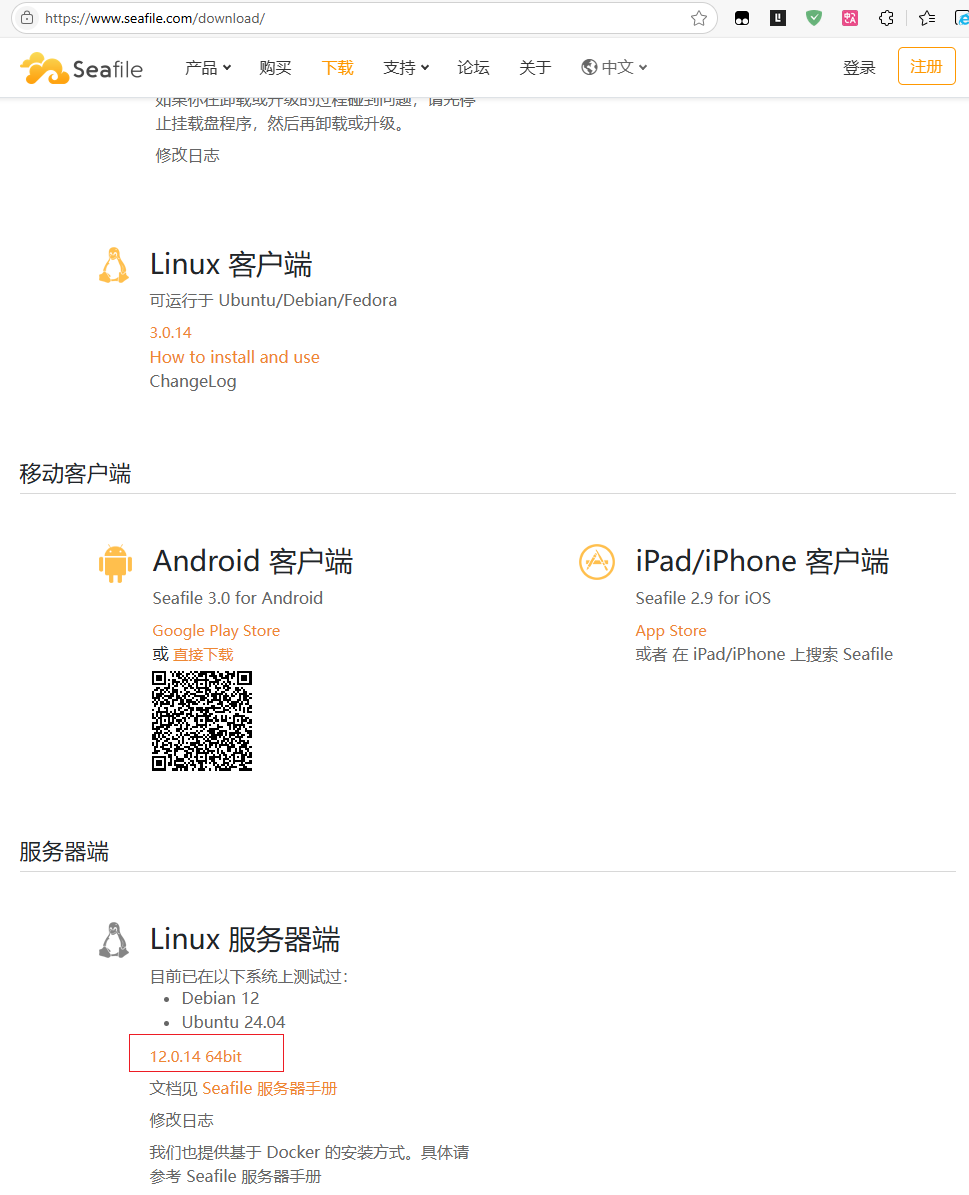
linux服务器端文件下载
前往链接下载 - Seafile,下载版本服务端文件,如下图
开始安装
官方提供安装教程:部署 Seafile 服务器 - seafile-manual-cn
部署配置及目录配置
将已经下载 seafile-server_12.0.14_x86-64.tar.gz 到/opt/seafile目录下。:
mkdir /opt/seafile
mv seafile-server_12.0.14_x86-64.tar.gz /opt/seafile
cd /opt/seafile
#将 seafile-server_12.0.14_x86-64.tar.gz 移动到 seafile 目录下后解压
tar -xzf seafile-server_12.0.14_x86-64.tar.gz
mkdir installed
mv seafile-server_12.0.14_x86-64.tar.gz installed
现在,你的目录看起来应该像这样:
#tree seafile -L 2
haiwen
├── installed
│   └── seafile-server_8.0.0_x86-64.tar.gz
└── seafile-server-8.0.0
    ├── reset-admin.sh
    ├── runtime
    ├── seafile
    ├── seafile.sh
    ├── seahub
    ├── seahub.sh
    ├── setup-seafile-mysql.sh
    └── upgrade
安装前准备
安装 Seafile 服务器之前,请确认已安装以下软件:
# Ubuntu 22.04 (almost the same for Ubuntu 20.04 and Debian 11, Debian 10)
sudo apt-get update
sudo apt-get install -y python3 python3-setuptools python3-pip libmysqlclient-dev   ldap-utils libldap2-dev
sudo apt-get install -y memcached libmemcached-dev
sudo pip3 install --timeout=3600 django==3.2.* future==0.18.* mysqlclient==2.1.* pymysql pillow==10.0.* pylibmc captcha==0.4 markupsafe==2.0.1 jinja2 sqlalchemy==2.0.18 psd-tools django-pylibmc django_simple_captcha==0.5.* djangosaml2==1.5.* pysaml2==7.2.* pycryptodome==3.16.* cffi==1.15.1 python-ldap==3.4.3 lxml -i https://repo.huaweicloud.com/repository/pypi/simple
安装MySQL
更新系统并安装MySQL
sudo apt update
sudo apt install mysql-server -y
启动MySQL服务
sudo systemctl start mysql
sudo systemctl enable mysql
运行安全配置向导(设置root密码)
sudo mysql_secure_installation按提示操作:
启用密码强度插件(可选):
Y移除匿名用户:
Y禁止root远程登录:
Y(后续手动允许远程)删除测试数据库:
Y重新加载权限表:
Y
登录MySQL并修改root用户
sudo mysql -u root -p输入设置的root密码后,执行:
-- 切换至mysql数据库
USE mysql;
-- 修改root用户的认证插件和密码(如果步骤3已设密码可跳过)
ALTER USER 'root'@'localhost' IDENTIFIED WITH mysql_native_password BY '你的新密码';
FLUSH PRIVILEGES;
-- 创建允许远程连接的root用户(或修改已有root)
CREATE USER 'root'@'%' IDENTIFIED WITH mysql_native_password BY '你的远程密码';
GRANT ALL PRIVILEGES ON *.* TO 'root'@'%' WITH GRANT OPTION;
FLUSH PRIVILEGES;
-- 退出
EXIT;允许MySQL远程访问
编辑配置文件:
sudo vim /etc/mysql/mysql.conf.d/mysqld.cnf找到 bind-address 并修改为:
bind-address = 0.0.0.0 # 允许所有IP访问重启MySQL服务
sudo systemctl restart mysql配置防火墙(如启用)
sudo ufw allow 3306/tcp  # 开放MySQL端口
sudo ufw reload
部署安装seafile
cd /opt/seafile/seafile-server-12.0.14
./setup-seafile-mysql.sh  #运行安装脚本并回答预设问题
如果你的系统中没有安装上面的某个软件,那么 Seafile初始化脚本会提醒你安装相应的软件包.
该脚本会依次询问你一些问题,从而一步步引导你配置 Seafile 的各项参数:
在这里, 你会被要求选择一种创建 Seafile 数据库的方式:
-------------------------------------------------------
Please choose a way to initialize seafile databases:
-------------------------------------------------------
[1] Create new ccnet/seafile/seahub databases
[2] Use existing ccnet/seafile/seahub databases
如果选择
1, 你需要提供根密码. 脚本程序会创建数据库和用户。如果选择
2, ccnet/seafile/seahub 数据库应该已经被你(或者其他人)提前创建。
如果安装正确完成,你会看到成功的信息。
现在你的目录结构看起来应该是这样:
#tree seafile -L 2
seafile
├── conf
│   └── ccnet.conf
│   └── seafile.conf
│   └── seahub_settings.py
│   └── gunicorn.conf
├── installed
│   └── seafile-server_8.0.0_x86-64.tar.gz
├── seafile-data
├── seafile-server-8.0.0  # active version
│   ├── reset-admin.sh
│   ├── runtime
│   ├── seafile
│   ├── seafile.sh
│   ├── seahub
│   ├── seahub.sh
│   ├── setup-seafile-mysql.sh
│   └── upgrade
├── seafile-server-latest  # symbolic link to seafile-server-8.0.0
├── seahub-data
│ └── avatarsseafile-server-latest文件夹为指向当前 Seafile 服务器文件夹的符号链接. 将来你升级到新版本后, 升级脚本会自动更新使其始终指向最新的 Seafile 服务器文件夹。
安装 Memcached 软件
# on Debian/Ubuntu 18.04/Ubuntu 20.04
apt-get install memcached libmemcached-dev -y
pip3 install --timeout=3600 pylibmc django-pylibmc
systemctl enable --now memcached
将以下配置添加到 seahub_settings.py 中:
CACHES = {
    'default': {
        'BACKEND': 'django_pylibmc.memcached.PyLibMCCache',
        'LOCATION': '127.0.0.1:11211',
    },
}
配置 Nginx
请先确保你的系统中安装了 Nginx。在 Ubuntu 下,你可以通过以下命令来安装
# Debian/Ubuntu
 sudo apt install nginx -y
然后我们添加 Nginx 的配置文件。Ubuntu 下请按照以下步骤添加
创建文件
/etc/nginx/site-available/seafile.conf,并拷贝以下内容删除
/etc/nginx/site-enabled/default:rm /etc/nginx/site-enabled/default创建符号链接:
ln -s /etc/nginx/sites-available/seafile.conf /etc/nginx/sites-enabled/seafile.conf
server {
    listen 80;
    server_name _;
    proxy_set_header X-Forwarded-For $remote_addr;
    location / {
         proxy_pass         http://127.0.0.1:8000;
         proxy_set_header   Host $http_host;
         proxy_set_header   X-Real-IP $remote_addr;
         proxy_set_header   X-Forwarded-For $proxy_add_x_forwarded_for;
         proxy_set_header   X-Forwarded-Host $server_name;
         proxy_read_timeout  1200s;
         # used for view/edit office file via Office Online Server
         client_max_body_size 0;
         access_log      /var/log/nginx/seahub.access.log;
         error_log       /var/log/nginx/seahub.error.log;
    }
    location /seafhttp {
        rewrite ^/seafhttp(.*)$ $1 break;
        proxy_pass http://127.0.0.1:8082;
        client_max_body_size 0;
        proxy_set_header   X-Forwarded-For $proxy_add_x_forwarded_for;
        proxy_connect_timeout  36000s;
        proxy_read_timeout  36000s;
        proxy_send_timeout  36000s;
        send_timeout  36000s;
    }
    location /media {
        root /opt/seafile/seafile-server-latest/seahub;
    }
}
Nginx 默认设置 "client_max_body_size" 为 1M。如果上传文件大于这个值的话,会报错,相关 HTTP 状态码为 423 ("Request Entity Too Large"). 你可以将值设为 0 以禁用此功能.
如果要上传大于 4GB 的文件,默认情况下 Nginx 会把整个文件存在一个临时文件中,然后发给上游服务器 (seaf-server),这样容易出错。使用 1.8.0 以上版本同时在 Nginx 配置文件中设置以下内容能解决这个问题:
    location /seafhttp {
        ... ...
        proxy_request_buffering off;
    }
配置JWT
openssl rand -hex 32 | awk '{print "JWT_PRIVATE_KEY=""$0"""}' > /opt/seafile/conf/.env启动 Seafile 服务器和 Seahub 网站
在 seafile-server-latest 目录下,运行如下命令
./seafile.sh start # 启动 Seafile 服务
./seahub.sh start  # 启动 Seahub 网站
你第一次启动 seahub 时,seahub.sh 脚本会提示你创建一个 seafile 管理员帐号。
恭喜! 现在你已经成功的安装了 Seafile 服务器。你可以通过 80 端口来访问 Seafile 服务了。
好吧,其实高兴太早了
踩坑修复
若出现页面正常访问,登录页面却显示内部服务器错误,检测日志如下:
tail -200f opt/seafile/logs/seafile.log

[2025-06-09 01:56:22] [WARNING] ../common/seaf-db.c(867): Failed to connect to MySQL: Plugin caching_sha2_password could not be loaded: /usr/lib/mariadb/plugin/caching_sha2_password.so: cannot open shared object file: No such file or directory
[2025-06-09 01:56:46] [WARNING] ../common/seaf-db.c(867): Failed to connect to MySQL: Plugin caching_sha2_password could not be loaded: /usr/lib/mariadb/plugin/caching_sha2_password.so: cannot open shared object file: No such file or directory
[2025-06-09 03:09:37] [WARNING] ../common/seaf-db.c(867): Failed to connect to MySQL: Plugin caching_sha2_password could not be loaded: /usr/lib/mariadb/plugin/caching_sha2_password.so: cannot open shared object file: No such file or directory
[2025-06-09 03:09:49] [WARNING] ../common/seaf-db.c(867): Failed to connect to MySQL: Plugin caching_sha2_password could not be loaded: /usr/lib/mariadb/plugin/caching_sha2_password.so: cannot open shared object file: No such file or directory其实日志非常明显,提示mysql用户认证方式为caching_sha2_password,而seafile无法加载该插件,所有需要更改:
更改数据库用户认证方式
登录 MySQL/MariaDB
mysql -u root -p检查当前用户认证方式
SELECT user, host, plugin FROM mysql.user WHERE user = 'seafile';(将
seafile替换为你的 Seafile 数据库用户名)修改认证插件为传统模式
ALTER USER 'seafile'@'127.0.0.1' IDENTIFIED WITH mysql_native_password BY 'your_password_here';替换
seafile和your_password_here为实际值刷新权限
FLUSH PRIVILEGES;验证修改
SELECT plugin FROM mysql.user WHERE user = 'seafile';应显示
mysql_native_password
恭喜! 现在你才是已经成功的安装了 Seafile 服务器。你可以通过 80 端口来访问 Seafile 服务了。
配置系统服务及开机自启(可选)
创建专属用户(如尚未创建):
sudo groupadd seafile
sudo useradd -d /opt/seafile -s /bin/bash -g seafile seafile修正安装路径所有权:
sudo chown -R seafile:seafile /opt/seafile创建系统服务
sudo vim /etc/systemd/system/seafile.service填入一下配置:
[Unit]
Description=Seafile Server (with Seahub)
After=network.target mysql.service
Requires=mysql.service # 如果使用 MySQL
[Service]
Type=forking
User=seafile
Group=seafile
WorkingDirectory=/opt/seafile/seafile-server-latest
# 关键:组合启动命令(先启动 seafile,等待 5 秒再启动 seahub)
ExecStart=/bin/bash -c "/opt/seafile/seafile-server-latest/seafile.sh start && sleep 5 && /opt/seafile/seafile-server-latest/seahub.sh start"
# 停止命令(先停止 seahub,再停止 seafile)
ExecStop=/bin/bash -c "/opt/seafile/seafile-server-latest/seahub.sh stop && /opt/seafile/seafile-server-latest/seafile.sh stop"
# 重启命令
ExecReload=/bin/bash -c "/opt/seafile/seafile-server-latest/seahub.sh stop && /opt/seafile/seafile-server-latest/seafile.sh stop && /opt/seafile/seafile-server-latest/seafile.sh start && sleep 5 && /opt/seafile/seafile-server-latest/seahub.sh start"
# 环境设置
Environment="LANG=en_US.UTF-8"
#Environment="PYTHONPATH=/opt/seafile/seafile-server-latest/seahub/thirdpart"
Restart=on-failure
RestartSec=30s
# 资源限制(可选)
#LimitNOFILE=65535
#LimitNPROC=65535
[Install]
WantedBy=multi-user.target
重载服务
sudo systemctl daemon-reload将原来的脚本停止,启动服务
./seafile.sh stop
./seahub.sh stop
systemctl restart seafile.service
服务加入开机自启动
systemctl enable seafile.servicedocker 安装seafile
服务器配置说明:
docker安装
安装 Docker
# 更新系统包列表
sudo apt update
# 安装依赖工具
sudo apt install -y apt-transport-https ca-certificates curl software-properties-common
# 添加 Docker 官方 GPG 密钥
curl -fsSL https://download.docker.com/linux/ubuntu/gpg | sudo gpg --dearmor -o /etc/apt/keyrings/docker.gpg
# 添加 Docker 仓库
echo "deb [arch=$(dpkg --print-architecture) signed-by=/etc/apt/keyrings/docker.gpg] https://download.docker.com/linux/ubuntu $(. /etc/os-release && echo "$VERSION_CODENAME") stable" | sudo tee /etc/apt/sources.list.d/docker.list > /dev/null
# 安装 Docker
sudo apt update
sudo apt install -y docker-ce docker-ce-cli containerd.io docker-buildx-plugin docker-compose-plugin配置国内镜像源
编辑 Docker 配置文件:
sudo vim /etc/docker/daemon.json添加以下内容(选择一个或多个国内镜像源):
{
"registry-mirrors": [
"https://docker.xuanyuan.me",
"https://docker.m.daocloud.io",
"https://docker.nju.edu.cn",
"https://docker.1ms.run"
]
}
重启 Docker 使配置生效
# 重载配置并重启服务
sudo systemctl daemon-reload
sudo systemctl restart docker
开始安装
官方提供安装教程:部署 Seafile docker 服务器
本文档的其余部分使用以下假设和约定:
/opt/seafile是存储 Seafile docker compose 文件的目录。如果你决定将 Seafile 放在不同的目录中(你可以),请相应地调整所有路径。Seafile 使用两个 Docker 卷来持久保存其数据库和 Seafile Docker 容器中生成的数据。卷的主机路径分别为 和 。建议不要更改这些路径。如果这样做,请在按照这些说明作时说明这一点。
/opt/seafile-mysql/opt/seafile-dataSeafile 和 Web 服务器 Nginx 的所有配置和日志文件都存储在 Seafile 容器的卷中。
下载和修改.env
从 Seafile Docker 12.0 开始,我们使用 和 文件进行配置.envseafile-server.ymlcaddy.yml
mkdir /opt/seafile
cd /opt/seafile

# Seafile CE 12.0
wget -O .env https://manual.seafile.com/12.0/repo/docker/ce/env
wget https://manual.seafile.com/12.0/repo/docker/seadoc.yml
wget https://manual.seafile.com/12.0/repo/docker/ce/seafile-server.yml
wget https://manual.seafile.com/12.0/repo/docker/caddy.yml

nano .env
以下字段值得特别注意:
启动 Seafile 服务器
使用以下命令启动 Seafile 服务器
docker compose up -d
注意
您必须在带有 .如果 file 在其他地方,请运行.env.env
docker compose -f /path/to/.env up -d
成功
启动服务后,您可以通过跟踪容器(即seafiledocker logs seafile -f)
---------------------------------
This is your configuration
---------------------------------

    server name:            seafile
    server ip/domain:       seafile.example.com

    seafile data dir:       /opt/seafile/seafile-data
    fileserver port:        8082

    database:               create new
    ccnet database:         ccnet_db
    seafile database:       seafile_db
    seahub database:        seahub_db
    database user:          seafile


Generating seafile configuration ...

done
Generating seahub configuration ...

----------------------------------------
Now creating seafevents database tables ...

----------------------------------------
----------------------------------------
Now creating ccnet database tables ...

----------------------------------------
----------------------------------------
Now creating seafile database tables ...

----------------------------------------
----------------------------------------
Now creating seahub database tables ...

----------------------------------------

creating seafile-server-latest symbolic link ...  done

-----------------------------------------------------------------
Your seafile server configuration has been finished successfully.
-----------------------------------------------------------------
然后您可以看到 Seafile 服务器成功启动的以下消息:
Starting seafile server, please wait ...
Seafile server started

Done.

Starting seahub at port 8000 ...

----------------------------------------
Successfully created seafile admin
----------------------------------------

Seahub is started

Done.
最后,您可以去使用 Seafile。http://seafile.example.com
Seafile 目录结构
路径/opt/seafile-data
共享卷的占位符点。您可以选择将某些持久性信息存储在容器外部,在我们的例子中,我们会将各种日志文件和上传目录保留在外部。这使您可以轻松重建容器,而不会丢失重要信息。
/opt/seafile-data/seafile:这是 seafile 服务器配置和数据的目录。
/opt/seafile-data/seafile/logs:这是包含 seafile 服务器进程日志文件的目录。例如,您可以在 中找到 seaf-server 日志。
/opt/seafile-data/seafile/logs/seafile.log
/opt/seafile-data/logs:这是作系统的目录。
/opt/seafile-data/logs/var-log:这是将在容器内挂载的目录。 包含 Seafile 容器中 Nginx 的日志。
/var/log/opt/seafile-data/logs/var-log/nginx
提示
从 Seafile Docker 12.0 开始,我们使用 Caddy 来做 Web 服务代理。如果您想访问 Caddy 的日志,您可以使用以下命令:
docker logs seafile-caddy --follow
查找日志
要监控容器日志(从容器外部),请使用以下命令:
# if the `.env` file is in current directory:
docker compose logs --follow
# if the `.env` file is elsewhere:
docker compose -f /path/to/.env logs --follow

# you can also specify container name:
docker compose logs seafile --follow
# or, if the `.env` file is elsewhere:
docker compose -f /path/to/.env logs seafile --follow
Seafile 日志位于 Docker 或运行 Docker 的服务器中。/shared/logs/seafile/opt/seafile-data/logs/seafile
系统日志位于 下或运行 docker 的服务器中。/shared/logs/var-log/opt/seafile-data/logs/var-log
要同时监控所有 Seafile 日志(从容器外部),请运行
sudo tail -f $(find /opt/seafile-data/ -type f -name *.log 2>/dev/null)
更多配置选项
配置文件位于 下。您可以根据配置部分修改配置/opt/seafile-data/seafile/conf
添加新管理员
确保容器正在运行,然后输入以下命令:
docker exec -it seafile /opt/seafile/seafile-server-latest/reset-admin.sh
根据提示输入用户名和密码。您现在拥有一个新的管理员帐户。
线上发布
seafile发布配置
Linux调整发布域名或ip
修改 /opt/seafile/conf/seahub_settings.py
vim /opt/seafile/conf/seahub_settings.py
# 配置文件上传url
FILE_SERVER_ROOT = "http://test.blog360.sbs/seafhttp"
保存重启即可
docker调整发布域名或ip
修改/opt/seafile/.env
vim /opt/seafile/.env
# 配置系统域名和协议

SEAFILE_SERVER_HOSTNAME=test.blog360.sbs
SEAFILE_SERVER_PROTOCOL=http
重新载入容器
# 清除容器
 docker compose down
# 重新载入容器
docker compose up -d
无公网IP方式
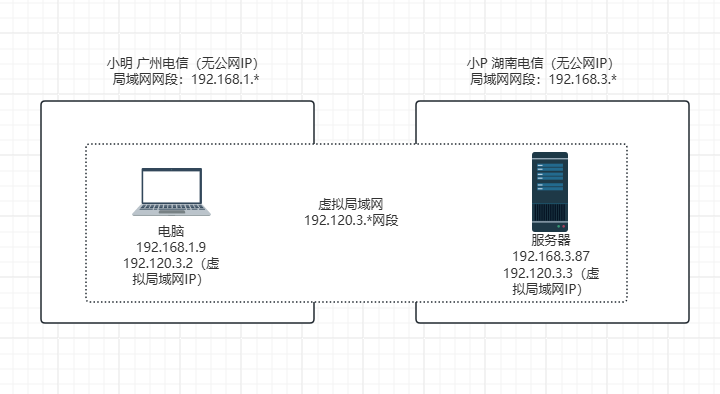
在无公网IP的情况下,需要在广域网使用,比较推荐的方式是使用虚拟局域网的方式进行,示意如下:
如何实现异地组网呢,打开zerotier这是官网,可以查看使用介绍。
注册zerotier,组建虚拟局域网
这块基本没有什么配置,使用默认配置即可
在 Linux (DEB/RPM)下安装
访问下载地址:zerotier sownload
通过添加正确的存储库并安装包的脚本来支持基于Debian和RP的发行版,包括Debian、Ubuntu、CentOS、RHEL、Fedora等。其他Linux发行版可能有自己的包。如果没有,请尝试从源代码构建和安装。
如果您愿意依赖SSL来验证网站,则可以通过以下方式完成一行安装:
curl -s https://install.zerotier.com | sudo bash如果您安装了GPG,则可以使用更安全的选项:
curl -s 'https://raw.githubusercontent.com/zerotier/ZeroTierOne/main/doc/contact%40zerotier.com.gpg' | gpg --import && \
if z=$(curl -s 'https://install.zerotier.com/' | gpg); then echo "$z" | sudo bash; fi
使用脚本后,使用apt或yum管理未来对zerotier-one的更新
在 Linux 下加入局域网
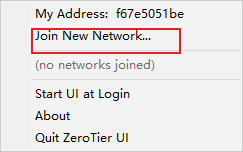
sudo zerotier-cli join 你的网络ID在 W10 下安装
直接访问下载地址:zerotier sownload,选择W10安装下载
在 W10 下加入网络
有公网IP方式
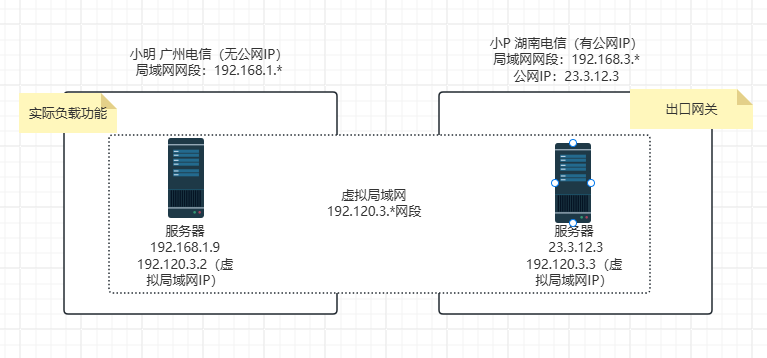
在无公网ip组网的方式上,用公网ip服务器作为网关及流量出口,所示如下:
在组网完成后,网关服务器配置nginx代理
server {

    listen 80;
    server_name test.blog360.sbs;
    #    return 404; # managed by Certbot

     location / {
                client_max_body_size 50m;
                proxy_set_header Host $host;
                proxy_set_header X-Real-IP $remote_addr;
                proxy_set_header X-Forwarded-For $proxy_add_x_forwarded_for;
                proxy_pass http://172.28.2.4/; #后端 真实服务器
                #proxy_pass http://git;
                index index.html index.htm A1-index.html;

  }


}
gzip 压缩优化
开启nginx gzip压缩,可以提高页面响应速度,在nginx配置文件中加入
gzip on;                        # 启用 Gzip
    gzip_comp_level 6;              # 压缩等级(1-9),推荐 5~6
    gzip_min_length 1024;           # 超过该大小的响应才启用压缩(单位:字节)
    gzip_buffers 16 8k;             # 缓冲区配置
    gzip_http_version 1.1;          # 压缩只对 HTTP 1.1+
    gzip_vary on;                   # 设置 Vary: Accept-Encoding
    gzip_proxied any;               # 支持代理服务器压缩

    # 压缩的 MIME 类型
    gzip_types
        text/plain
        text/css
        text/xml
        text/javascript
        application/javascript
        application/x-javascript
        application/xml
        application/xml+rss
        application/json
        application/vnd.ms-fontobject
        application/x-font-ttf
        font/opentype
        image/svg+xml;

    gzip_disable "msie6";           # 禁用 IE6 的 gzip,防止兼容问题
开启域名ssl
启用域名https访问,申请免费证书
安装Certbot工具
# Ubuntu/Debian
sudo apt update
sudo apt install certbot python3-certbot-nginx

# CentOS/RHEL
sudo yum install epel-release
sudo yum install certbot python3-certbot-nginx
申请ssl证书(nginx)
sudo certbot --nginx -d your-domain.com替换
your-domain.com为你的域名