
前言
GitLab 当前最流行的,一个用于仓库管理系统的开源项目,使用Git作为代码管理工具, 并在此基础上搭建起来的Web服务。 GitLab-10万企业使用的一站式DevOps平台
GitLab国际官网:https://about.gitlab.com/
低成本线上发布:
有公网IP VPS,但是性能资源及其拉跨。
只能上网,没有公网IP。
Linux安装教程
服务器配置说明:
官网安装教程地址:https://gitlab.cn/install/
添加GitLab官方仓库并安装
# 添加GitLab仓库
curl https://packages.gitlab.com/install/repositories/gitlab/gitlab-ce/script.deb.sh | sudo bash
# 搜索GitLab社区版版本信息
apt-cache madison gitlab-ce
# 更新指定版本信息
# apt-get upgrade gitlab-ce=16.8.4-ce.0
# 安装GitLab社区版
sudo apt install gitlab-ce安装速度过慢解决方案
使用代理
# 设置环境变量(适用于所有 apt 命令)
export http_proxy="http://<代理地址>:<端口>"
export https_proxy="http://<代理地址>:<端口>"
# 需要管理员权限时使用
sudo -E apt update
sudo -E apt install gitlab-ce使用国内镜像
# 信任GitLab仓库
curl -sS https://packages.gitlab.com/gpg.key | sudo gpg --dearmor -o /usr/share/keyrings/gitlab-archive-keyring.gpg
# 添加清华镜像源(替代官方源)
echo "deb [arch=amd64 signed-by=/usr/share/keyrings/gitlab-archive-keyring.gpg] https://mirrors.tuna.tsinghua.edu.cn/gitlab-ce/ubuntu $(lsb_release -cs) main" | sudo tee /etc/apt/sources.list.d/gitlab-ce.list
# 更新软件包列表
sudo apt update升级教程
apt update
# 搜索GitLab社区版版本信息
apt-cache madison gitlab-ce
# 更新指定版本信息
apt-get upgrade gitlab-ce=16.8.4-ce.0配置GitLab
安装完成后,编辑配置文件/etc/gitlab/gitlab.rb。配置项包括主机名、邮件服务、存储路径等。确保配置文件中包含以下内容:
建议配置:
external_url 'http://gitlab.example.com'
gitlab_rails['smtp_enable'] = true
gitlab_rails['smtp_address'] = "smtp.example.com"
gitlab_rails['smtp_port'] = 587
gitlab_rails['smtp_user_name'] = "smtp user"
gitlab_rails['smtp_password'] = "smtp password"
gitlab_rails['smtp_domain'] = "example.com"
完整配置
基础网络配置
# 最重要配置:GitLab 外部访问地址(必须修改!)
external_url 'https://gitlab.example.com'
# 监听设置(默认所有接口的80和443端口)
nginx['listen_address'] = '0.0.0.0'
nginx['listen_port'] = 80
nginx['listen_https'] = true
# HTTPS 自动重定向(推荐开启)
nginx['redirect_http_to_https'] = trueHTTPS/SSL 配置
# Let's Encrypt 自动证书(推荐使用)
letsencrypt['enable'] = true
letsencrypt['contact_emails'] = ['admin@example.com'] # 通知邮箱
letsencrypt['auto_renew'] = true
letsencrypt['auto_renew_hour'] = 0
letsencrypt['auto_renew_day_of_month'] = "*/7"
# 手动指定证书路径
# nginx['ssl_certificate'] = "/etc/gitlab/ssl/gitlab-example.com.crt"
# nginx['ssl_certificate_key'] = "/etc/gitlab/ssl/gitlab-example.com.key"数据库配置
# 默认使用内建 PostgreSQL(生产环境建议外部分离)
postgresql['enable'] = true
postgresql['shared_buffers'] = "256MB" # 分配25%的系统内存给DB
# 外部数据库配置示例
# gitlab_rails['db_adapter'] = 'postgresql'
# gitlab_rails['db_encoding'] = 'unicode'
# gitlab_rails['db_host'] = '127.0.0.1'
# gitlab_rails['db_port'] = 5432
# gitlab_rails['db_username'] = 'gitlab'
# gitlab_rails['db_password'] = 'securepassword'邮件服务器配置(必须设置)
gitlab_rails['smtp_enable'] = true
gitlab_rails['smtp_address'] = "smtp.example.com"
gitlab_rails['smtp_port'] = 465
gitlab_rails['smtp_user_name'] = "gitlab@example.com"
gitlab_rails['smtp_password'] = "smtp-password"
gitlab_rails['smtp_domain'] = "example.com"
gitlab_rails['smtp_authentication'] = "login"
gitlab_rails['smtp_enable_starttls_auto'] = true
gitlab_rails['smtp_tls'] = true

# 发件人地址
gitlab_rails['gitlab_email_from'] = 'gitlab@example.com'
gitlab_rails['gitlab_email_reply_to'] = 'noreply@example.com'
数据存储路径
# Git 仓库存储位置(可配置多个位置)
git_data_dirs({
  "default" => { "path" => "/var/opt/gitlab/git-data" },
  "secondary" => { "path" => "/mnt/gitlab/git-data" }
})

# 上传文件存储(推荐使用对象存储)
# gitlab_rails['uploads_storage_path'] = "/var/opt/gitlab/gitlab-rails/uploads"
备份配置
gitlab_rails['backup_path'] = "/var/opt/gitlab/backups"
gitlab_rails['backup_keep_time'] = 604800 # 保留7天备份

# 加密备份(推荐)
# gitlab_rails['backup_encryption'] = 'AES256'
# gitlab_rails['backup_encryption_key_path'] = '/etc/gitlab/backup_encryption_key'

# 上传到远程存储 (AWS S3示例)
# gitlab_rails['backup_upload_connection'] = {
#   'provider' => 'AWS',
#   'aws_access_key_id' => 'ACCESS_KEY',
#   'aws_secret_access_key' => 'SECRET_KEY',
#   'region' => 'us-east-1'
# }
# gitlab_rails['backup_upload_remote_directory'] = 'gitlab-backups'
性能优化配置
# Puma (Web服务器)
puma['worker_processes'] = 2              # 建议设置为 (CPU核心数 * 1.5).to_i
puma['min_threads'] = 10
puma['max_threads'] = 20

# Sidekiq (后台任务)
sidekiq['max_concurrency'] = 15

# 工作进程最大内存限制
unicorn['worker_memory_limit_min'] = "300 * 1 << 20" # 300MB
unicorn['worker_memory_limit_max'] = "350 * 1 << 20" # 350MB
容器镜像仓库配置
registry['enable'] = true
registry_external_url 'https://registry.example.com'
registry['debug_addr'] = "localhost:5001"

# 证书配置
registry_nginx['ssl_certificate'] = "/etc/gitlab/ssl/registry-example.com.crt"
registry_nginx['ssl_certificate_key'] = "/etc/gitlab/ssl/registry-example.com.key"

# 存储后端(推荐使用对象存储)
# registry['storage'] = {
#   's3' => {
#     'bucket' => 'gitlab-registry',
#     'region' => 'us-east-1',
#     'accesskey' => 'AWS_ACCESS_KEY',
#     'secretkey' => 'AWS_SECRET_KEY'
#   }
# }
监控与日志
# 内置监控工具
prometheus['enable'] = true
node_exporter['enable'] = true
redis_exporter['enable'] = true
postgres_exporter['enable'] = true

# Grafana 仪表板
grafana['enable'] = true
grafana['admin_password'] = 'grafana-password'

# 日志设置
logging['log_directory'] = "/var/log/gitlab"
logging['logrotate_use_size'] = 100 * 1024 * 1024 # 100MB 轮转
logging['logrotate_count'] = 10
安全增强配置
# 密码策略
gitlab_rails['password_authentication_enabled_for_web'] = true
gitlab_rails['password_authentication_enabled_for_git'] = true
gitlab_rails['min_password_length'] = 12

# 双重认证
gitlab_rails['two_factor_authentication_required'] = true

# 会话管理
gitlab_rails['session_expire_delay'] = 720 # 12小时会话超时

# 禁用注册(内部使用场景)
# gitlab_rails['signup_enabled'] = false
高级集成配置
# LDAP 集成
gitlab_rails['ldap_enabled'] = true
gitlab_rails['ldap_servers'] = {
  'main' => {
    'label' => 'LDAP',
    'host' => 'ldap.example.com',
    'port' => 636,
    'uid' => 'sAMAccountName',
    'encryption' => 'simple_tls',
    'verify_certificates' => true,
    'bind_dn' => 'CN=GitLab,OU=Service Accounts,DC=example,DC=com',
    'password' => 'ldap-password',
    'base' => 'DC=example,DC=com'
  }
}

# OAuth 提供商 (GitHub示例)
gitlab_rails['omniauth_enabled'] = true
gitlab_rails['omniauth_providers'] = [
  {
    name: "github",
    app_id: "github_app_id",
    app_secret: "github_app_secret",
    args: { scope: "user:email" }
  }
]配置完成后,运行sudo gitlab-ctl reconfigure应用配置。
配置防火墙(如启用)
sudo ufw allow http     # 允许HTTP(80端口)
sudo ufw allow https    # 允许HTTPS(443端口)
sudo ufw allow ssh      # 允许SSH(22端口)
sudo ufw reload
访问GitLab
安装完成后:
打开浏览器访问
EXTERNAL_URL设置的地址。首次访问需设置密码:为
root管理员账户设置密码(8位以上)。使用用户名
root和设置的密码登录。
关键配置文件(可选)
/etc/gitlab/gitlab.rb修改后需执行
sudo gitlab-ctl reconfigure生效。
sudo gitlab-ctl start      # 启动
sudo gitlab-ctl stop       # 停止
sudo gitlab-ctl restart    # 重启
sudo gitlab-ctl status     # 查看状态
gitlab-backup create       # 备份
配置HTTPS(可选)
获取SSL证书(如Let's Encrypt):
sudo apt install certbot -y
   sudo certbot certonly --standalone -d 你的域名
编辑
/etc/gitlab/gitlab.rbexternal_url 'https://你的域名'
nginx['redirect_http_to_https'] = true
letsencrypt['enable'] = false # 禁用GitLab内置的Let's Encrypt(避免冲突)应用配置:
sudo gitlab-ctl reconfigure
解决常见问题
502错误
:通常因内存不足(至少需4GB)。可尝试:
sudo gitlab-ctl restart sidekiq
sudo gitlab-ctl restart nginx
重置管理员密码
sudo gitlab-rake "gitlab:password:reset[root]"docke安装gitalb教程
服务器配置说明:
官网安装教程地址:https://gitlab.cn/install/
国际安装教程地址:https://docs.gitlab.com/install/docker/installation/#install-gitlab-by-using-docker-compose
安装docker
更新系统包列表
sudo apt update安装依赖工具
sudo apt install -y apt-transport-https ca-certificates curl software-properties-common添加 Docker 官方 GPG 密钥
curl -fsSL https://download.docker.com/linux/ubuntu/gpg | sudo gpg --dearmor -o /etc/apt/keyrings/docker.gpg添加 Docker 仓库
echo "deb [arch=$(dpkg --print-architecture) signed-by=/etc/apt/keyrings/docker.gpg] https://download.docker.com/linux/ubuntu $(. /etc/os-release && echo "$VERSION_CODENAME") stable" | sudo tee /etc/apt/sources.list.d/docker.list > /dev/null安装 Docker
sudo apt update
sudo apt install -y docker-ce docker-ce-cli containerd.io docker-buildx-plugin docker-compose-plugin
配置国内镜像源
编辑 Docker 配置文件:
sudo vim /etc/docker/daemon.json
添加以下内容(选择一个或多个国内镜像源):
{
  "registry-mirrors": [
    "https://docker.xuanyuan.me",
    "https://docker.m.daocloud.io",
    "https://docker.nju.edu.cn",
    "https://docker.1ms.run"
  ]
}
重启 Docker 使配置生效
# 重载配置并重启服务
sudo systemctl daemon-reload
sudo systemctl restart docker
docker安装gitlab
为卷创建目录
对于托管 Gitaly 数据的卷,存在具体建议。基于 NFS 的文件系统可能会导致性能问题,因此不建议使用 EFS。
为配置文件、日志、 和数据文件。该目录可以位于用户的主目录中(例如 ~/gitlab-docker) 或位于 /srv/gitlab 之类的目录中。
Create the directory: 创建目录:
sudo mkdir -p /opt/gitlab
如果您使用
root以外的用户运行 Docker,请向用户授予新目录的适当权限。配置一个新的环境变量
$GITLAB_HOME,用于设置您创建的目录的路径:export GITLAB_HOME=/opt/gitlab
GitLab 容器使用主机挂载的卷来存储持久数据:
创建 docker-compose.yml 文件。 例如
services:
  gitlab:
    image: gitlab/gitlab-ce:<version>-ce.0
    container_name: gitlab
    restart: always
    hostname: 'gitlab.example.com'
    environment:
      GITLAB_OMNIBUS_CONFIG: |
        # Add any other gitlab.rb configuration here, each on its own line
        external_url 'https://gitlab.example.com'
    ports:
      - '80:80'
      - '443:443'
      - '22:22'
    volumes:
      - '$GITLAB_HOME/config:/etc/gitlab'
      - '$GITLAB_HOME/logs:/var/log/gitlab'
      - '$GITLAB_HOME/data:/var/opt/gitlab'
    shm_size: '256m'
在与 docker-compose.yml 相同的目录中,启动 GitLab:
docker compose up -d升级教程
由于GitLab系统较为复杂庞大,因此升级需要遵循官方的升级路径进行升级,升级前先检查是否与升级路径一致,切记不可直接跨大版本升级,可能会由于数据结构不一致导致无法启动。
因此升级需要遵循官方升级路径的版本顺序依次升级,不可跳过中间版本直接升级,特别不能跨越大版本更新,否则会报错无法启动成功。例如我当前的版本是:v14.6.1,我的升级路径如下:
14.9.5 => 14.10.5 => 15.0.5 => 15.4.6 => 15.11.13 => 16.3.1每次更新docker-compose.yaml中的镜像版本号,然后执行:
docker compose up -d确保每次更新版本号启动后进入healthy状态,并且日志输出变缓,只有访问gitlab才有少量请求日志后再进行重复操作,直至版本升级至最新版。
线上发布
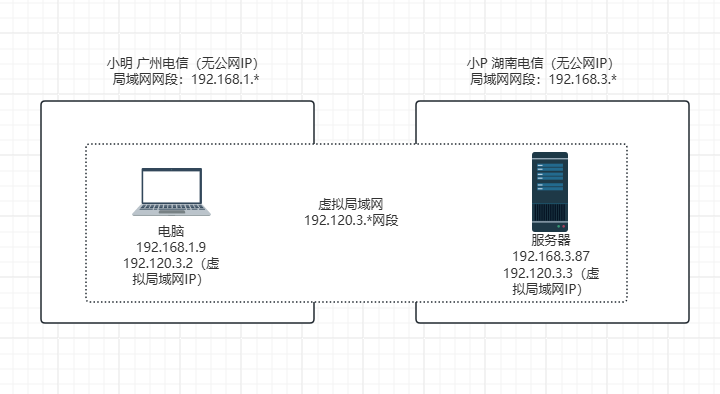
无公网IP方式
在无公网IP的情况下,需要在广域网使用,比较推荐的方式是使用虚拟局域网的方式进行,示意如下:
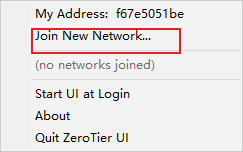
如何实现异地组网呢,打开zerotier这是官网,可以查看使用介绍。
注册zerotier,组建虚拟局域网
这块基本没有什么配置,使用默认配置即可
在 Linux (DEB/RPM)下安装
访问下载地址:zerotier sownload
通过添加正确的存储库并安装包的脚本来支持基于Debian和RP的发行版,包括Debian、Ubuntu、CentOS、RHEL、Fedora等。其他Linux发行版可能有自己的包。如果没有,请尝试从源代码构建和安装。
如果您愿意依赖SSL来验证网站,则可以通过以下方式完成一行安装:
curl -s https://install.zerotier.com | sudo bash如果您安装了GPG,则可以使用更安全的选项:
curl -s 'https://raw.githubusercontent.com/zerotier/ZeroTierOne/main/doc/contact%40zerotier.com.gpg' | gpg --import && \
if z=$(curl -s 'https://install.zerotier.com/' | gpg); then echo "$z" | sudo bash; fi
使用脚本后,使用apt或yum管理未来对zerotier-one的更新
在 Linux 下加入局域网
sudo zerotier-cli join 你的网络ID在 W10 下安装
直接访问下载地址:zerotier sownload,选择W10安装下载
在 W10 下加入网络
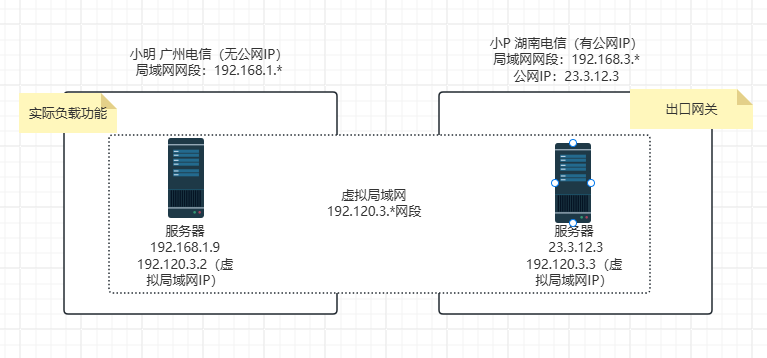
有公网IP方式
在无公网ip组网的方式上,用公网ip服务器作为网关及流量出口,所示如下:
在组网完成后,网关服务器配置nginx代理
server {

    listen 80;
    server_name test.blog360.sbs;
    #    return 404; # managed by Certbot

     location / {
                client_max_body_size 50m;
                proxy_set_header Host $host;
                proxy_set_header X-Real-IP $remote_addr;
                proxy_set_header X-Forwarded-For $proxy_add_x_forwarded_for;
                proxy_pass http://172.28.2.4/; #后端 真实服务器
                #proxy_pass http://git;
                index index.html index.htm A1-index.html;

  }


}
开启域名ssl
启用域名https访问,申请免费证书
安装Certbot工具
# Ubuntu/Debian
sudo apt update
sudo apt install certbot python3-certbot-nginx

# CentOS/RHEL
sudo yum install epel-release
sudo yum install certbot python3-certbot-nginx
申请ssl证书(nginx)
sudo certbot --nginx -d your-domain.com替换
your-domain.com为你的域名